Lesson 6. Practice Forking a GitHub Repository and Submitting Pull Requests
In this lesson, you will learn how to submit a pull request to suggest that your edits be included in another repository (e.g. the original repository from which you forked and cloned a repository).
Learning Objectives
After completing this lesson, you will be able to:
- Explain the relationship between a forked repository (head) and the original repository (base).
- Submit a pull request of changes to a repository on
GitHub.com.
What You Need
Be sure that you have also completed the Activity on Version Control with Git/GitHub.
You will also need a web browser and your GitHub.com login (username and password).
For this assignment, you will add a new Jupyter Notebook file that contains information about your hometown.
Step 1: Fork and Clone The GitHub Repo To Make a Copy That You Own
To begin, fork the Earth Lab Education Hometowns GitHub repository. Remember that this step only needs to be done once. When you create this fork, you then have full ownership of the fork in your user account. Full ownership means that you can make direct changes to the fork without submitting a Pull Request.
After you have forked the repo, clone it so that you have a copy locally to work with on your computer.
Data Tip: Remember that you can use git remote -v to view the url path of your clone. This will allow you to ensure that your cloned your FORK rather than the repo owned by earthlab-education.
Step 2: Create a Jupyter Notebook For The Town that You Live In
In the local clone, create and save a Jupyter Notebook called city-state-or-country.ipynb (change the name to include the city, state and country - e.g. houston-tx.ipynb) to a directory with the path structure as follows:
country/
   state/
      city/
If state doesn’t make sense for you - you can simply use the country/city directory structure.
Your final file path will look like this: ea-bootcamp-hometowns/country/state/city/houston-tx.ipynb
In your jupyter notebook add the following three interesting facts about the town that you live in using Markdown:
- add a Location subtitle (header) with the latitude and longitude of the town center below it
- add a Population subtitle (header) and the information for the most recent population figure you can find, plus a hyperlink to the source for this information
- add a Landmark subtitle (header) for a local landmark,
- Add an image and short text description of this landmark.
If a file for your town already exists in this repo as a markdown file, you can add any other facts about your town to that file that you wish following the structure listed above!
Step 3: Create a .csv File For Your Town
Create a new csv file in the 0-csv-files/ directory using the csv-file-template.csv template file. Name the new csv: country-city.csv. Fill out the information for each row in the .csv file using the example table below as a template. You will add the following information to the file:
- Who - this represents who you are. the options include:
- cu-student
- certificate-student and
- earthdatascience.org student
- type: the type of entry this is. The options include:
- place i’ve lived
- where I live now
- place I love
- country: the country that you live in
- State: the state that you live in (or province, district, etc)
- city: the name of the city that you live in
- latitude: the latitude of the city center where you live
- longitude: the longitude of the city center where you live
Your file will look something like this:
| who (OPTIONS: cu-student; certificate-student; earthdatascience.org student) | type | country | state | city | latitude | longitude |
|---|---|---|---|---|---|---|
| earthdatascience.org student | place i’ve lived | USA | State | City | latitude-here | longitude-here |
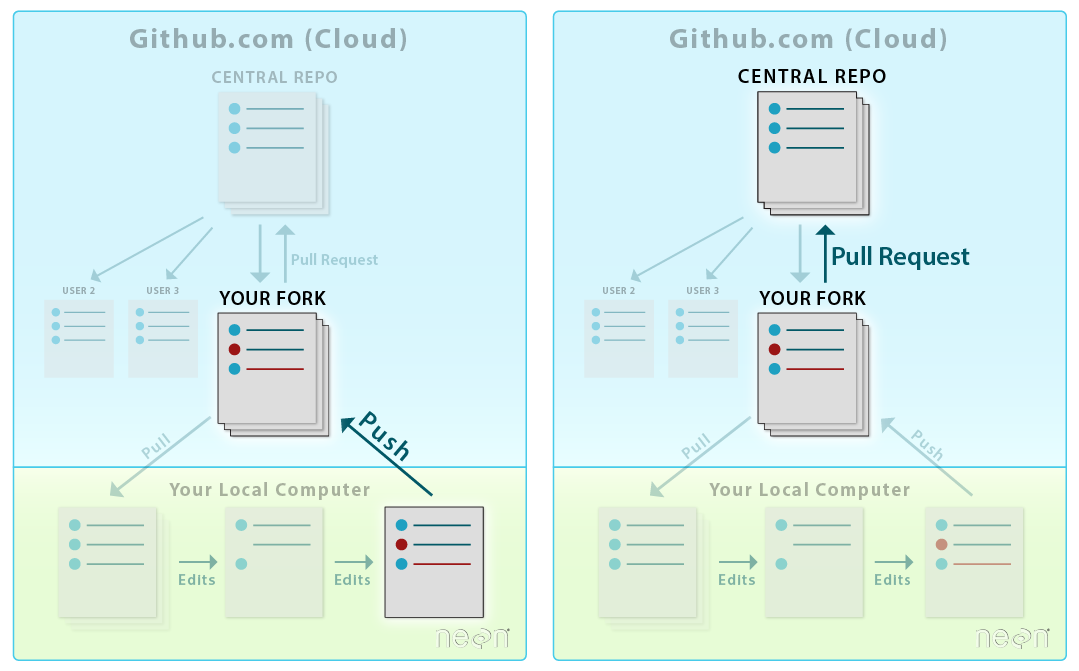
Step 4: Submit a Pull Request To the earthlab-education/ea-bootcamp-hometowns repo
Once you have made the changes, use git add and git commit to commit the changes locally. Use git push to push those changes up to your fork. And finally, submit a pull request from your fork to this repository, with the following included in the message of your pull request:
- notify the owner of the repository (your instructor) that you have addressed the issue using
@github-username - reference the issue number using
Fixes #issue-number(e.g. the issue number is above in the title of this issue) - If you are working online, you may not have an issue with your name on it! just submit the PR without mentioning an issue or a github user.
Activity Notes
- As you are working, be sure to keep track of where you are working and what repository your are pushing too. Remember that you can always use
git remote -vto determine the path to the repo that you are pushing to when you rungit pushlocally. - Once you have made your changes, you can submit a Pull Request to the earthlab-education repo. Be sure to check that the changes you are submitted look correct in the Pull Request before you consider your work, done!
CU Students Notes
If you are a student at CU, you will be adding files for two different cities! Be sure to follow the instructions carefully!
Wrapping Up
Congratulations! You know now know how to complete a workflow on GitHub.com that involves:
- forking a repo that you don’t own,
- cloning and making changes to the repo,
- pushing the changes back to your fork, and
- submitting a pull request
Share on
Twitter Facebook Google+ LinkedIn
Leave a Comment