Lesson 6. Practice Using Git and GitHub to Manage Files
In this lesson, you will learn how to implement version control using Git and GitHub.
Learning Objectives
After completing this lesson, you will be able to:
- Explain how
GitandGitHub.comare used to implement version control. - Use
Gittoaddandcommitchanged files. - Use
Gittopushchanged files from your local computer to the repository onGitHub.com.
What You Need
You will need:
- an active GitHub account with your username and password
- to fork and clone the practice github repository to complete this lesson.
- a web browser with internet access
Git and GitHub Workflow For Version Control
In the previous lessons, you learned how to fork and clone existing GitHub repositories to make copies of other users’ repositories and download them to your computer.
In this lesson, you expand on those skills to:
- check the
statusof changed files in a repository addchanged files to version control trackingcommitthe changed files to your local repositorypushthose changed files from the local copy of a repository to the cloud (GitHub.com)
In later lessons, you will expand on this version control workflow to notify others (your collaborators) about changes you have made and that you would like to add to the original (main) copy of a repository.
Challenge 1: Check Git Configuration Settings
To begin, check your github configuration. Type the following in bash:
$ git config user.name
$ git config user.email
The output of the above commands should return your username and email for git. If it does not or it returns nothing, you will need to review the instructions for configuring git locally on your computer.
Data tip: You can also use $ git config --list to view all configuration settings for git on your machine.</a>
Challenge 2: Make Changes to Files
STEP 1: Make Changes to a File
- Use Shell to navigate to your forked repository (the
practice-git-skillzdirectory).
If you don’t have this repo locally - you can clone it using the following url: https://github.com/your-user-name-here/practice-git-skillz
- Launch Jupyter Notebook inside that directory. (If you are working on a JupyterHub you can skip this step!)
Open the
Jupyter Notebookfile in that directory(homework-example.ipynb) and make some changes to the file as follows:- Add a markdown cell to the notebook
- In the cell add a heading and then some text below.
STEP 2: Check the Status of Your Changed File
Return to your shell tool. Run the command:
git status
to check the status of current changes. It should show that there is a change to the file.
$ git status
On branch main
Your branch is up-to-date with 'origin/main'.
Changes not staged for commit:
  (use "git add <file>..." to update what will be committed)
  (use "git checkout -- <file>..." to discard changes in working directory)

	modified:   homework-example.ipynb

no changes added to commit (use "git add" and/or "git commit -a")
The output from git status indicates that you have modified the file homework-example.ipynb. To add these changes to your git history you need to:
addthe changes, and thencommitthe changes using a useful message that describes what you changed.
STEP 3: Add and Commit Changed Files
You will use the add and commit functions to add and commit your changed files.
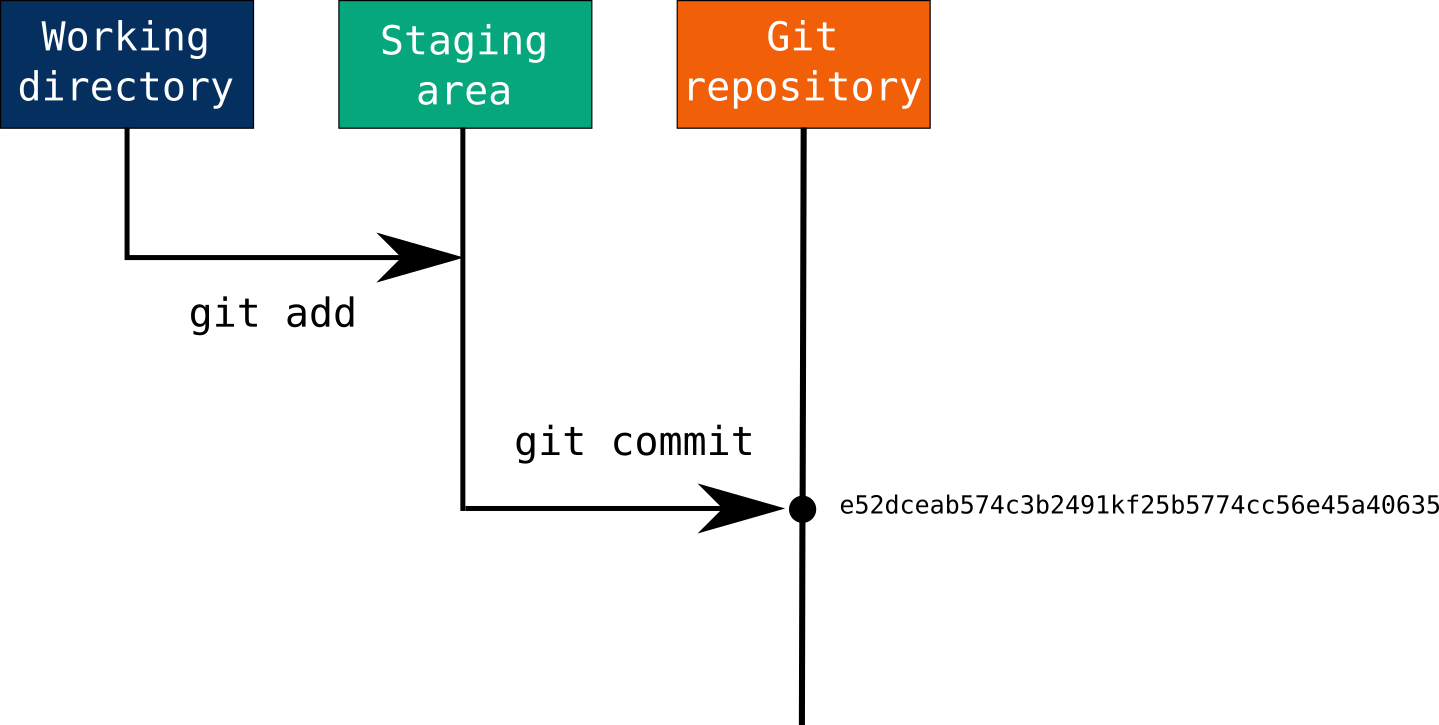
git add: takes a modified file in your working directory and places the modified version in a staging area.git commit: takes everything from the staging area and makes a permanent snapshot of the current state of your repository that is associated with a unique identifier.
These two commands make up the bulk of many workflows that use git for version control.
STEP 4: Push Your Changes to GitHub.com
Once you have added and commited your changes, you are ready to push them to GitHub.com. Use:
$ git push
to push the changes to your fork.
Congratulations! You’ve now successfully modified files in a GitHub repo and pushed them back up to github.com. We suggest that you run through this process several times to get the hang of it. Working in a small group may be useful as you do this.
Challenge 3
Rename the Jupyter Notebook in your repository. Then add and commit the file. Push the renamed file up to Github. Then check that it’s there by going to github.com!
- Add a new file to the repo, commit the change and push it to github.com. Check to see that it’s there.
- Use
git logto view the history of changes that you’ve made.
Share on
Twitter Facebook Google+ LinkedIn
Leave a Comment