Lesson 4. Get Started with Git Commands for Version Control
Learning Objectives
After completing this page, you will be able to:
- Use git to
addandcommitchanged files to version control. - Use git to
pushchanged files from your local computer to the repository on Github.com. - Use git to
pullchanged file from your repo to your local computer.
Git and GitHub Workflow For Version Control
Previously, you learned how to fork GitHub repositories to make copies of other users’ repositories, and you also learned how to download copies of (i.e. clone) GitHub repositories to your computer. On this page, you will learn to use git to implement the three important steps of version control:
git addchanged files to version control tracking.git committhe changed files to create a unique snapshot of the local repository.git pushthose changed files from the local copy of a repository to the cloud (GitHub.com).
You will also setup your git credentials locally.
Check the Status of Changes Using Git Status
Once you start working, you can use the git status command to check what changes are being identified by git. To practice working with this command, use the terminal to navigate to your git practice repository:
$ cd practice-git-skillz
Next, run git status.
$ git status

On branch main
Your branch is up to date with 'origin/main'.

nothing to commit, working tree clean
Notice that when you run git status it returns: working tree clean. This
means that there are no changes to any files in your repo - YET.
Next, open and make a small change to the README.md file in a text editor. Then, run
the command git status to check that changes have been made to your file(s).
git status
On branch main
Your branch is up-to-date with 'origin/main'.
Changes not staged for commit:
  (use "git add <file>..." to update what will be committed)
  (use "git checkout -- <file>..." to discard changes in working directory)

	modified:   README.md

no changes added to commit (use "git add" and/or "git commit -a")
The output from the git status command above indicates that you have modified a file
(e.g. README.md) that can be added to version control.
Adding and Committing File Changes To Version Control
To keep track of changes to this file using git, you need to:
- first
git addthe changes to tracking (or staging area), and then git committhe changes to version control.
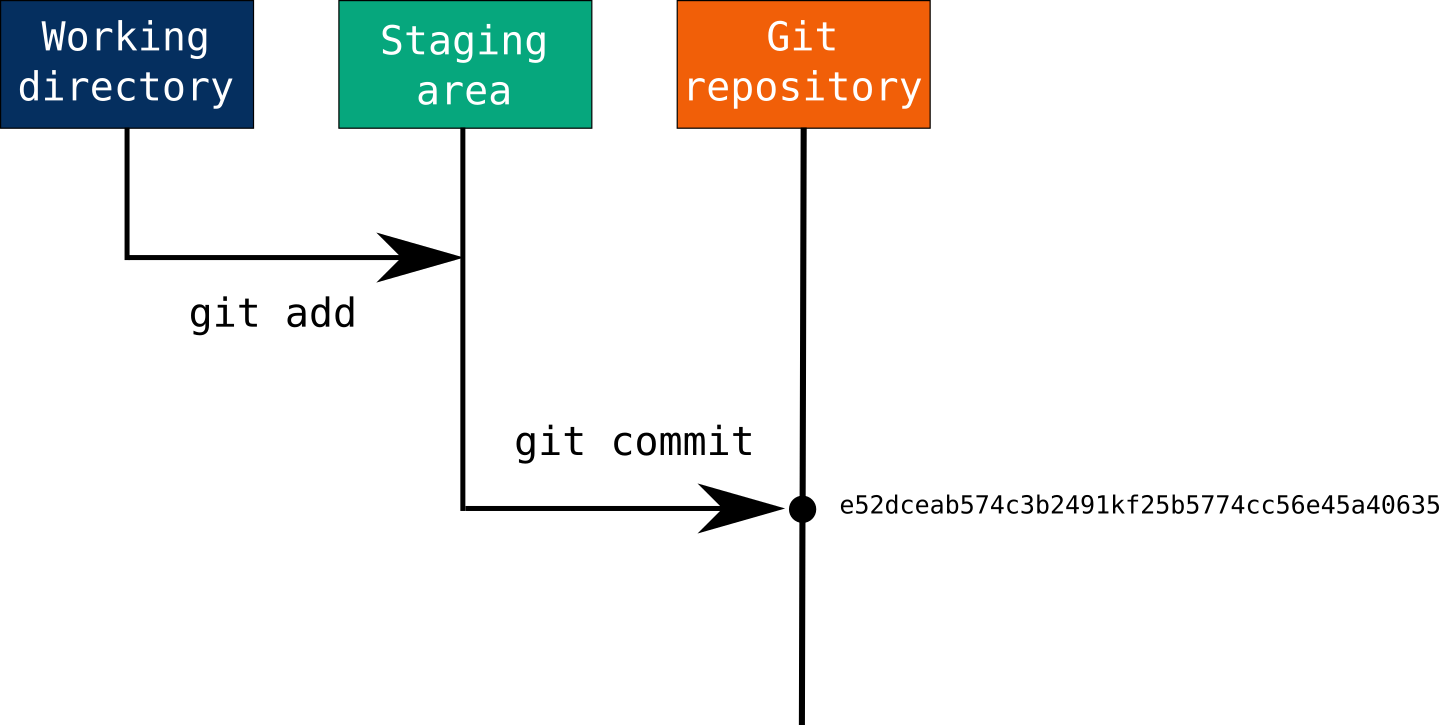
These two commands make up the bulk of many workflows that use git for version control:
-
git add: takes a modified file in your working directory and places the modified version in a staging area for review. -
git commit: takes everything from the staging area and makes a permanent snapshot of the current state of your repository that has a unique identifier.
Add Changed Files Using git add
After making changes, you can add either an individual file or groups of files to version control tracking. To add a single file, run the command:
git add file-name.extension
For example, to add the README.md file, you would use:
git add README.md
You can also add all of the files that you have edited at the same time using:
git add .
Data Tip use git add . with caution. Be sure to review the results from git status carefully before using git add .. You do not want to accidentally add files to version control that you do not want to change in your GitHub repository!
Commit Changed Files Using git commit
Once you are ready to make a snapshot of the current state of your repository (i.e. move changes from staging area), you can run git commit. The git commit command requires a commit message that describes the snapshot (i.e. changes) that you made in that commit.
A commit message should outline what changed and why. These messages:
- help collaborators and your future self understand what was changed and why.
- allow you and your collaborators to find (and undo if necessary) changes that were previously made.
When you are not committing a lot of changes, you can create a short one line commit message using the -m flag as follows:
git commit -m "Update title and author name in homework for week 3"
Each commit is provided a unique identifier (SHA-1 hash) and includes all changes to files in the staging area when the commit was created (i.e. all files that had been added to staging using git add).
Push Changed Files to GitHub.com
So far you have only modified your local copy of the repository and completed
a local commit to the repository. To update the files on GitHub.com, you
need to push the changed files to the repository on GitHub.com.
You can push your changes to GitHub using the command:
git push origin main
Depending on your settings, you may then be prompted for your Github.com username and password. After you have pushed your commits to GitHub.com, visit your repository (e.g. https://github.com/username/repository-name) and notice that your changes are reflected there.
Also notice that you have access to the full commit history for your repository.
Pull Changed Files from GitHub.com to Your Cloned Repo
Above, you learned how to use git clone to create a copy of a repo on github.com
on your local computer. Running git clone will make a full copy of the git repo
from github.com to your
local computer. It includes all of the .git history information that you will need
to track changes in your repo. You only need to run git clone once. After you have
run git clone, you can us git pull to upate your repo.
You also learned how to add and commit changes using git add and git commit.
The workflow above assumed that you are always making changes locally and then pushing those changes back up to GitHub.com. Sometimes, however, you will need to pull down changes that were made to your repo, locally.
Some examples of when you may need to use git pull include:
- When you may want to use git pull is to retrieve the feedback
.htmlfile added to your GitHub repo by your instructor - When you are working collaboratively (covered in the next chapter) and someone else modifies some of the code in your repo using a
pull request.
To update your repo with changes that are on GitHub.com you can do the following:
- Open up bash and
cdto the location of your git repo. - Once you are in the repo, run
git pull.
In the example below, there are no changes to any files. git pull returns Already
up to date.
$ cd practice-git-skillz/
$ git pull
Already
up to date
.
Below is an example of using git pull when there are changes on github.com to pull
down. Notice that it gives you a summary of what files were changed (in the example
below this is the README.md file) and how many changes were made.
$ cd practice-git-skillz/
$ git pull
remote: Enumerating objects: 5, done.
remote: Counting objects: 100% (5/5), done.
remote: Compressing objects: 100% (3/3), done.
remote: Total 3 (delta 2), reused 0 (delta 0), pack-reused 0
Unpacking objects: 100% (3/3), done.
From github.com:earthlab-education/practice-git-skillz
   7d45e2c..675d82e  main     -> origin/main
Updating 7d45e2c..675d82e
Fast-forward
 README.md | 2 +-
 1 file changed, 1 insertion(+), 1 deletion(-)
All of the changes that were made to your repo, will be pulled down to your local repo.
View All Commits to Repository Using git log
You can also see a list of all commits to a repository (even those that have yet not been pushed to GitHub.com!) when working locally with the repository on your computer.
To see a list of all commits, you can run the command:
git log
Which returns something like the following:
commit 6575476476hdjig946jksg95jywkg034mk6gkro6
Author: eastudent <eastudent@email.edu>
Date:   Mon Aug 5 15:30:54 2019 -0600

    Update title and author name in homework for week 3
Notice that git log provides a lot of useful information about the commit, including the unique identifier assigned to that snapshot, the message description provided during the commit (i.e. the message after -m) as well as the date, time, and author of the commit.
Data Tip git log by default returns a lot of information. You can view the log as single line entries with just the commit message using git log --pretty=oneline. git log --
pretty=oneline | head -n 10 will show you the most recent 10 entries. IMPORTANT: when the log results appear in bash, you can use the space bar to scroll through the results. If you want to return to the command prompt, hit the q key (q for quit). Try it out!
Tell Git to Ignore Files Using a .gitignore file
Sometimes there are files in your git repo that you do not want to be tracked. If you are on a MAC these may be hidden files such as
- _DS_STORE or
- .ipynb checkpoint files.
Other times you have sensitive files in a repository that you never want to track with git such as API credentials or other files containing personal information.
You can add any file types or names to a .gitignore file. git will then not track them. This means that when you run git add or git status, it will not track any files listed in the .gitignore file. These files will thus never be added to GitHub.com.
Let’s pretend that you have a file called social-security.txt that contains sensitive
information. You can add that file to a .gitignore file. If the .gitignore file
is not already present in the repository, you can create it manually using a text, or
using the following bash command:
# Comment in bash
# Create a .gitignore file if one doesn't already exist
touch .gitignore
Data Tip Above, the bash command touch is used to create a new .gitignore file (this is only useful if the file does not already exist.
Open this .gitignore file in a text editor and add the file names (with no other information needed) that you want git to ignore, for example:
social-security.txt
Any files listed in the .gitignore file will be ignored by git. You can also tell git to ignore directories by adding the directory name to the gitignore file (e.g. ignore a directory called private-directory):
private-directory/
Data tip: Learn more about using .gitignore files to ignore files and directories in your git repository on the Software Carpentry Git Lessons.
Challenge - Create a New Text File In Your Repo
It’s time to practice your git skills! Do the following:
- If you haven’t already, fork the
https://github.com/earthlab-education/practice-git-skillzrepo. - Next, clone your fork of that repo using
git clone - Open up the
README.mdfile and make some changes to the text - Use
git addandgit committo add and commit those changes - Finally push the changes up to github.com using
git push
Now, go to the url where the repo is on Github.com - the path to the repo likely looks something like the path below:
(replace your-github-username with your real github username!)
https://github.com/your-github-username/practice-git-skillz
Do you see your changes to the README.md file?
Share on
Twitter Facebook Google+ LinkedIn
Leave a Comment